1. Introduction
This module is a Bluetooth module specially designed for data transmission, following the Bluetooth 2.0 protocol, supporting SPP Bluetooth serial port protocol, and supporting UART interface.Has low cost, good compatibility, low power consumption, and other advantages.1.Can be used for pairing with various Bluetooth-enabled computers, Bluetooth hosts, mobile phones, PDAs, computer brains, Bluetooth hosts, mobile phones, PDAs, PSP, and other smart terminals.Wide baud rate range of 4800, 1382400, and the module is compatible with 5V.A 3.3V single-chip microcontroller system, after the master-slave mode two Bluetooth modules are paired successfully, it can simply replace the previous serial port communication application and change to wireless Bluetooth communication.
2 Module Parameters
Pin Name | description |
|---|---|
G | GND (Negative Power Input) |
V | VCC (Positive Power Input) |
TX | Information Sending Interface |
RX | Information Receiving Interface |
Voltage: 3.3V-6V
Connection method: PH2.0 4P terminal wire
Module size: 31mm*31mm
Installation aperture: Aperture 3mm, spacing 12mm
Communication distance: Maximum 10 meters
Bluetooth name: BT05-A
Pairing code: 1234 (SPP protocol is valid)
Bluetooth certification: ROHS REACH FCC CE
Communication interface: UART
Operating frequency: 2.4GHz ISM band
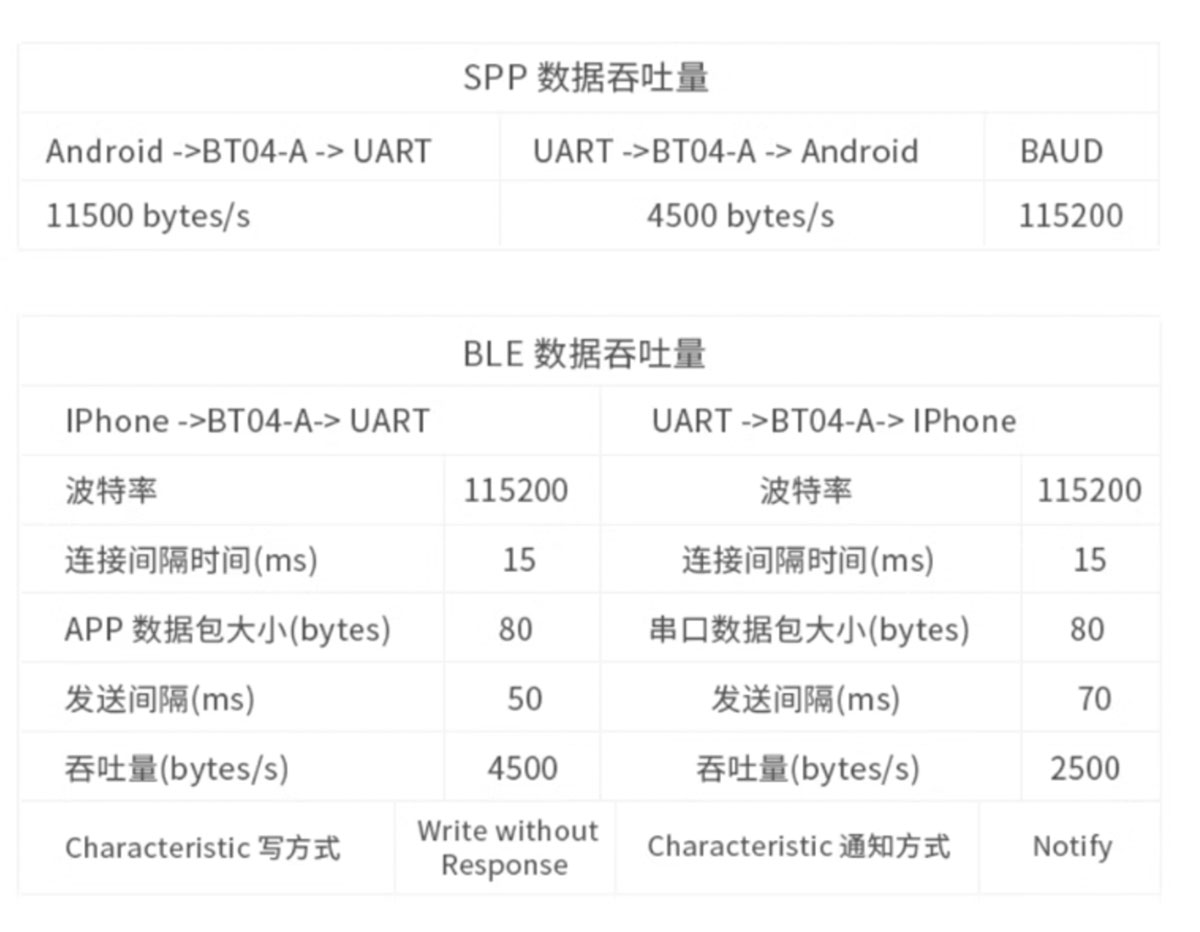
Bluetooth Protocol: Bluetooth Specification V3.0 SPP + V4.2 BLE
Transmit Power: 4dBm
3, circuit board size

4. Arduino IDE example program
Attention: If prompted with an error message about the library file during program upload, please import the library file first!
Arduino IDE Library Download and Import Tutorial:Click to view
Example program (UNO development board):
#include <SoftwareSerial.h>
SoftwareSerial mySerial(6,5);
volatile char lanya;
void setup(){
mySerial.begin(9600);
lanya = 0;
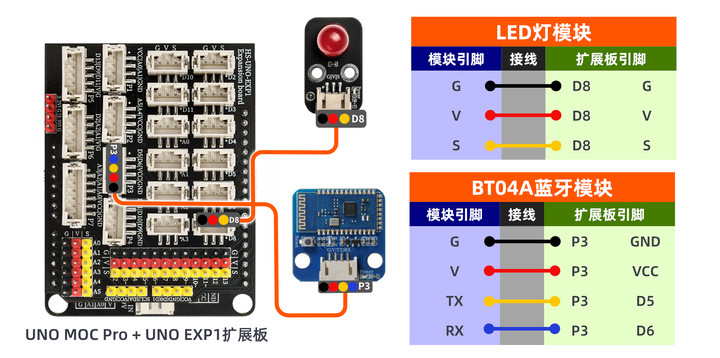
//uno扩展板D6引脚接蓝牙模块RX引脚,D5引脚接蓝牙模块TX引脚;
//蓝牙模块G,V分别接扩展板G,V;led模块D4
pinMode(8, OUTPUT);
pinMode(13, OUTPUT);
}
void loop(){
if (mySerial.available() > 0) {
lanya = mySerial.read();
switch (lanya) {
case '1':
digitalWrite(8,HIGH);
digitalWrite(13,HIGH);
break;
case '0':
digitalWrite(8,LOW);
digitalWrite(13,LOW);
break;
}
}
}5, Mischic Mixly Example Program (Graphic Language)
Example program (UNO development board):Click to download
Attention: If prompted with an error message about the library file during program upload, please import the library file first!
Download and import tutorial of Mixly IDE Arduino library:Click to view
6, Test Environment Setup
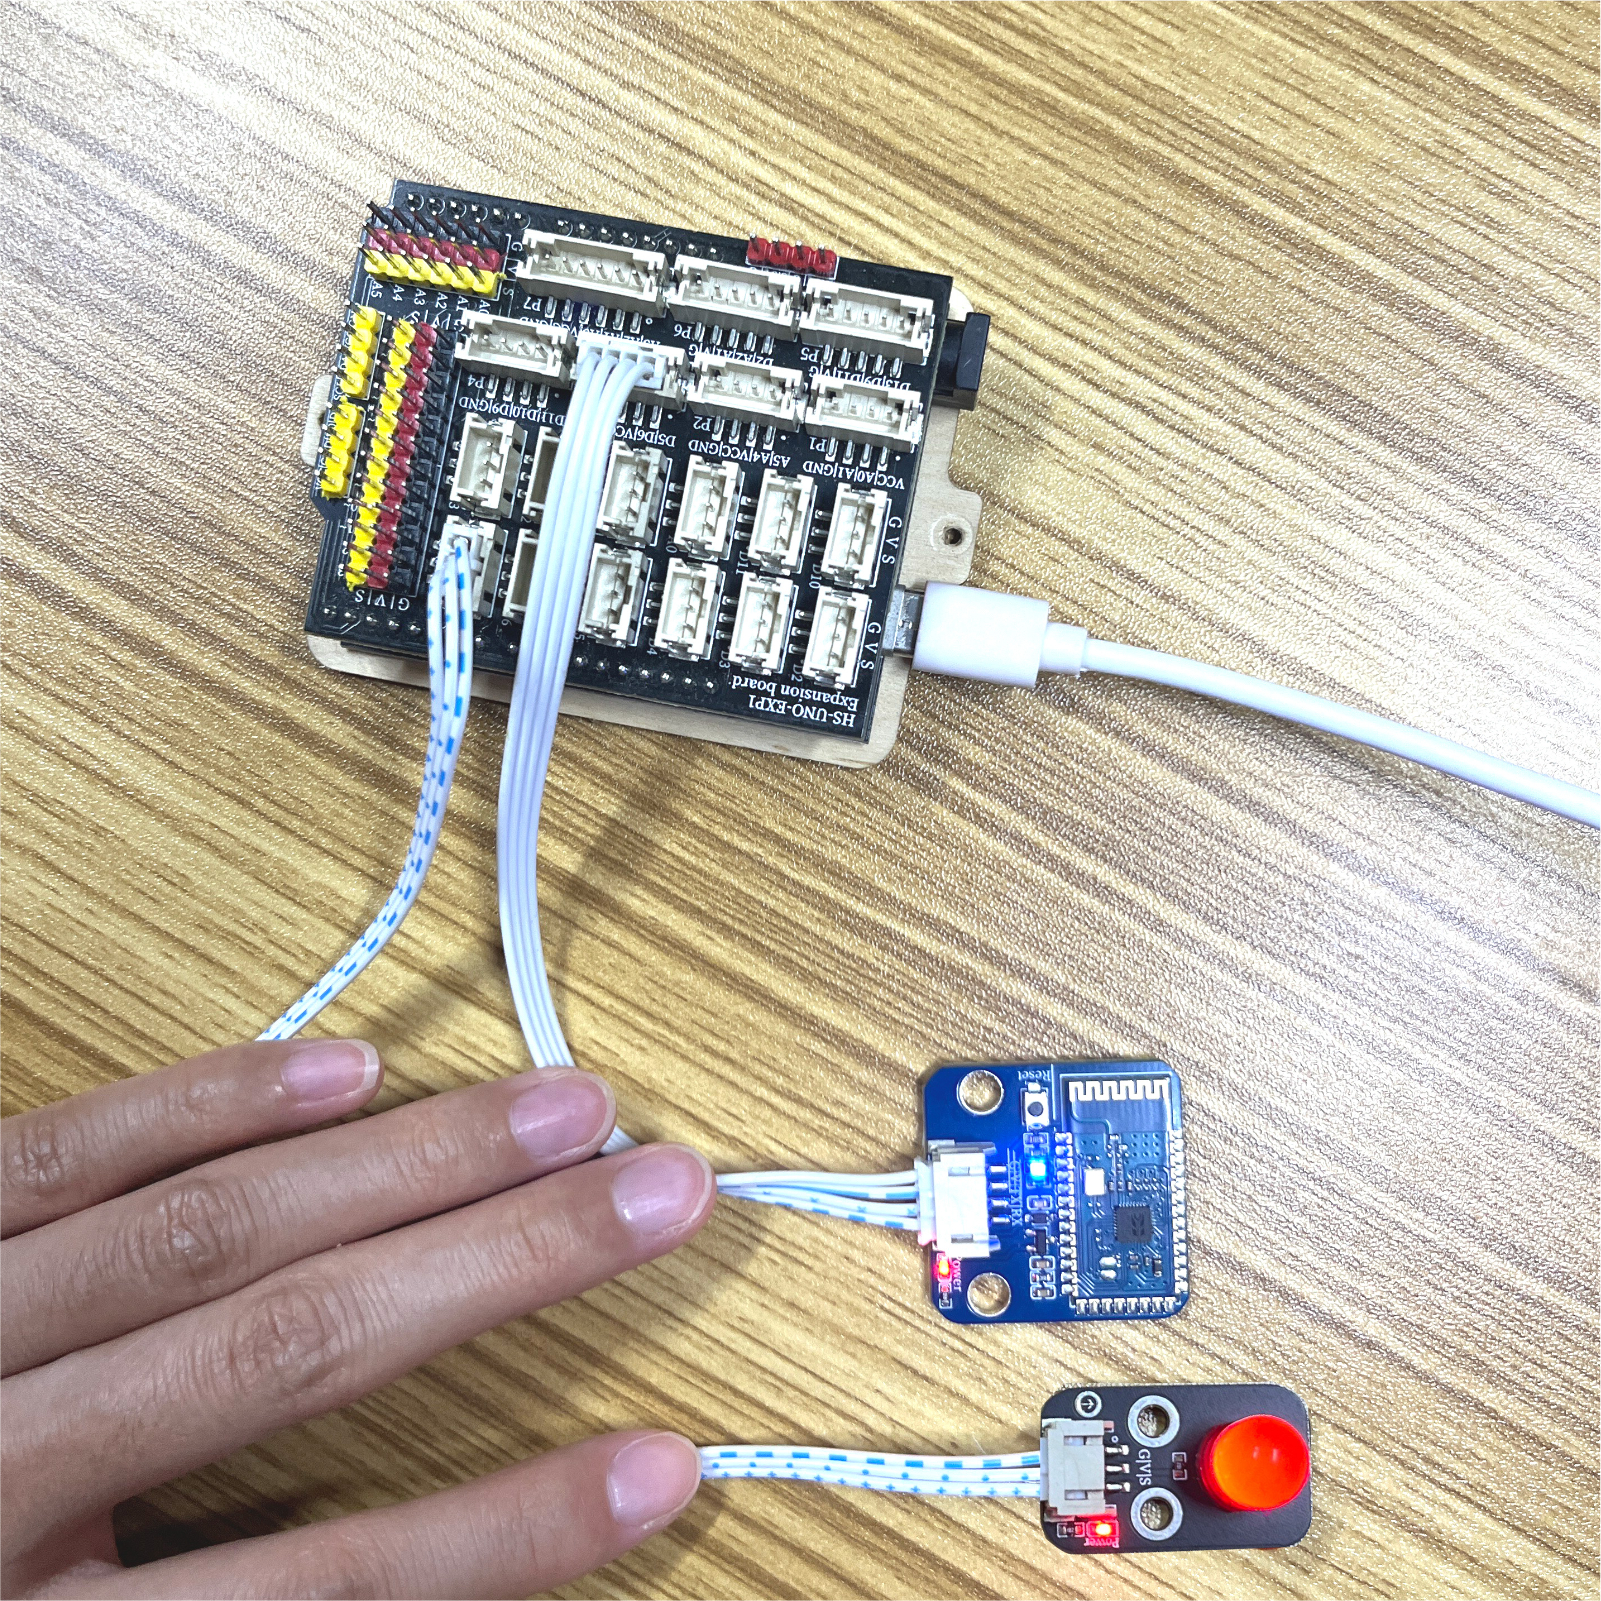
Arduino UNO Test Environment Setup
Prepare Components:
HELLO STEM UNO R3 PRO DEVELOPMENT BOARD *1
UNO R3P expansion board*1
USB TYPE-C DATA CABLE *1
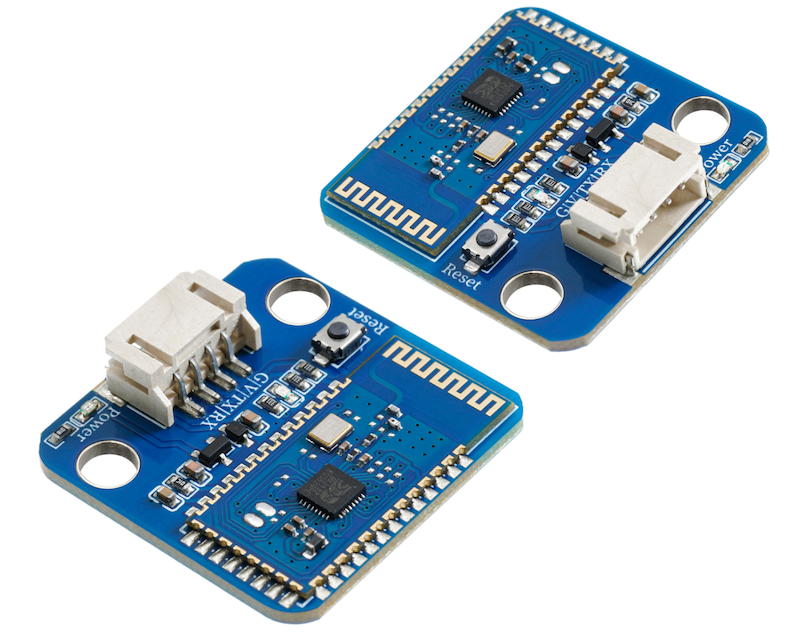
LED module (HS-F08L) *1
Bluetooth module (HS-S60-L) * 1
PH2.0 3P dual-ended terminal line * 1
PH2.0 4P dual-head terminal line * 1
Android phone * 1 unit
Circuit wiring diagram:
Step 7: Install the Bluetooth serial port communication app on the mobile phone
You can search for Bluetooth Serial Port Assistant in the APP market, generally third-party ones can be used, if you can't find it, we have placed a download link for an APK (1_base) software (Bluetooth debugger) on our official website, which can be imported into the phone and installed.First open the software, then connect Bluetooth.
Bluetooth software:Click to download
1. Open the app
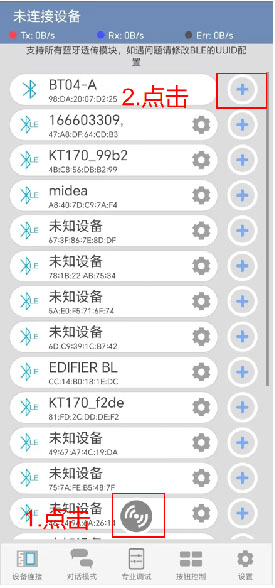
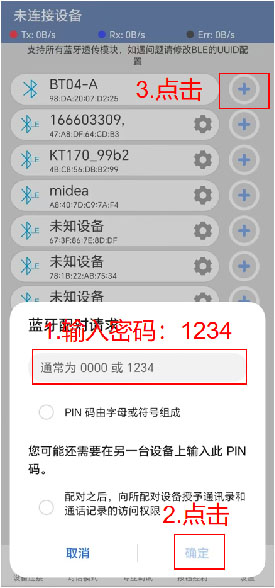
2. Pair BT05-A Bluetooth module
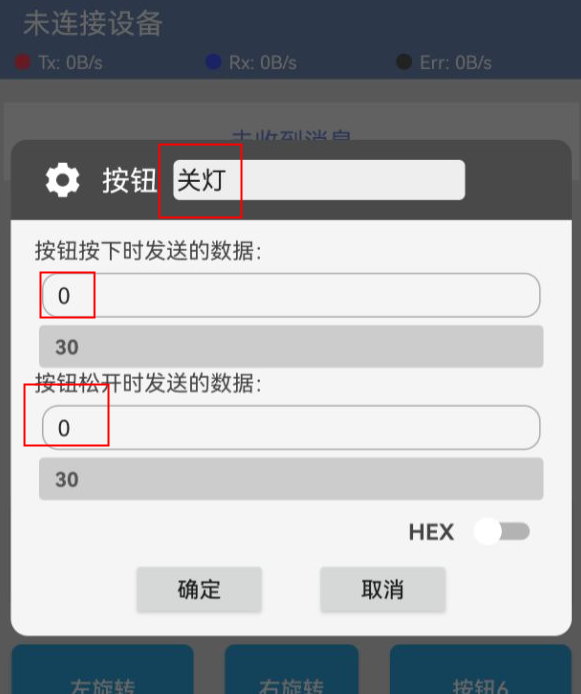
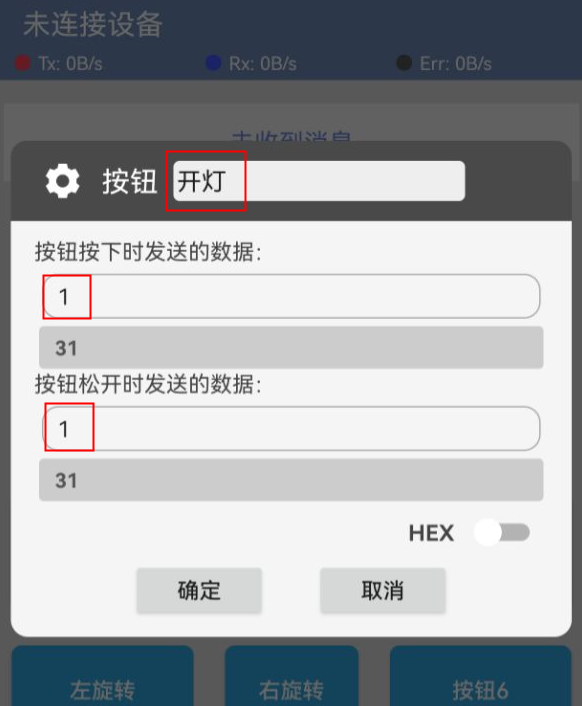
3. After connecting Bluetooth, open the button control interface
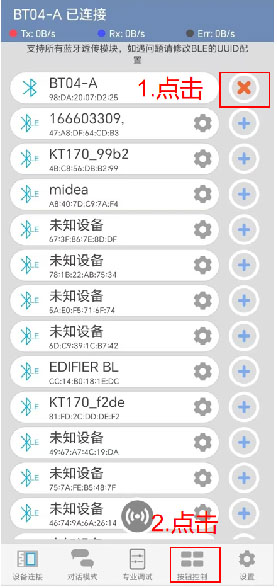
4. Edit button control led

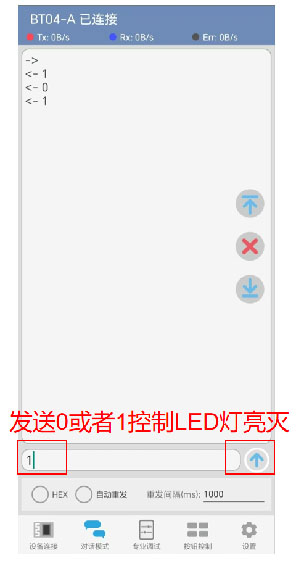
5. Enter dialogue mode to control led
8. Video tutorial
Video tutorial:Click to view
9, test result
Arduino UNO test results:
After the device is connected to the wire, upload the above program to the Arduino UNO development board, then open the mobile app software, connect Bluetooth, enter edit mode to set the data sent by the two buttons, and then exit edit mode.When the Arduino Uno receives data '1', the LED light turns on, and when it receives data '0', the LED light turns off.We also enter the dialogue mode to send data "1" or send data "0" to control the LED on and off.