
1. Introduction
The function of the sound sensor module is equivalent to a microphone (microphone).It is used to receive sound waves, display the vibration image of sound, but cannot measure the intensity of noise.The sensor is built-in with a sound-sensitive capacitive condenser microphone.Sound waves cause the piezoelectric film inside the microphone to vibrate, resulting in a change in capacitance, and thus producing a corresponding small voltage change.This voltage is then converted into a 0-5V voltage, which is accepted by the data acquisition device after A/D conversion and sent to the main control chip.
2. Schematic
HS-S05P Sound Sensor SchematicClick to view
Module Parameters
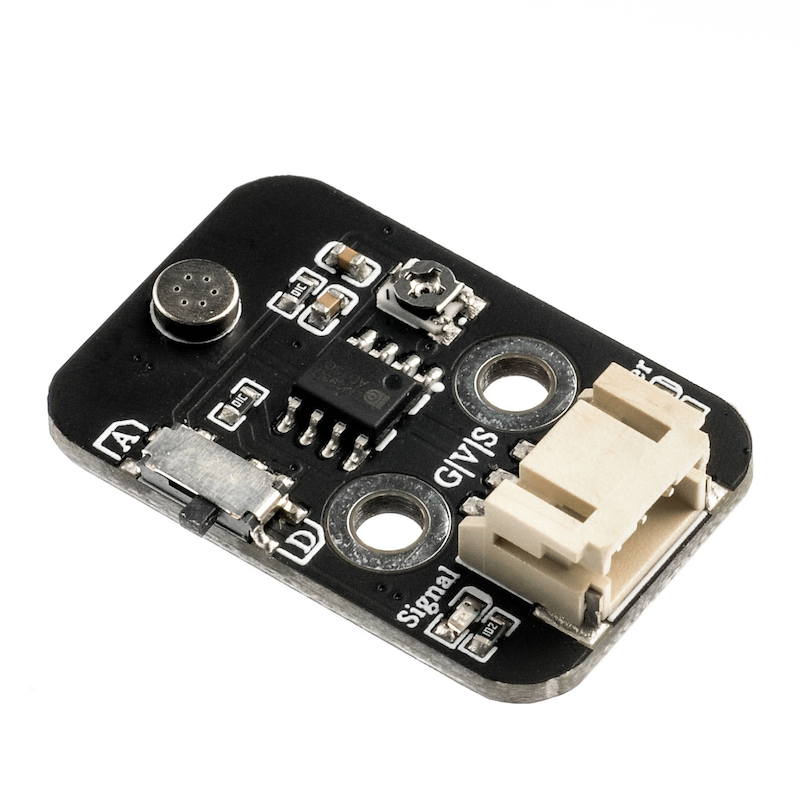
Pin Name | description |
|---|---|
G | GND (Negative Power Input) |
V | VCC (Positive Power Input) |
S | Digital Signal Pin |
Power Supply Voltage: 3.3V / 5V
Connection method: PH2.0 3P terminal
Installation Method: Double Screw Fixed
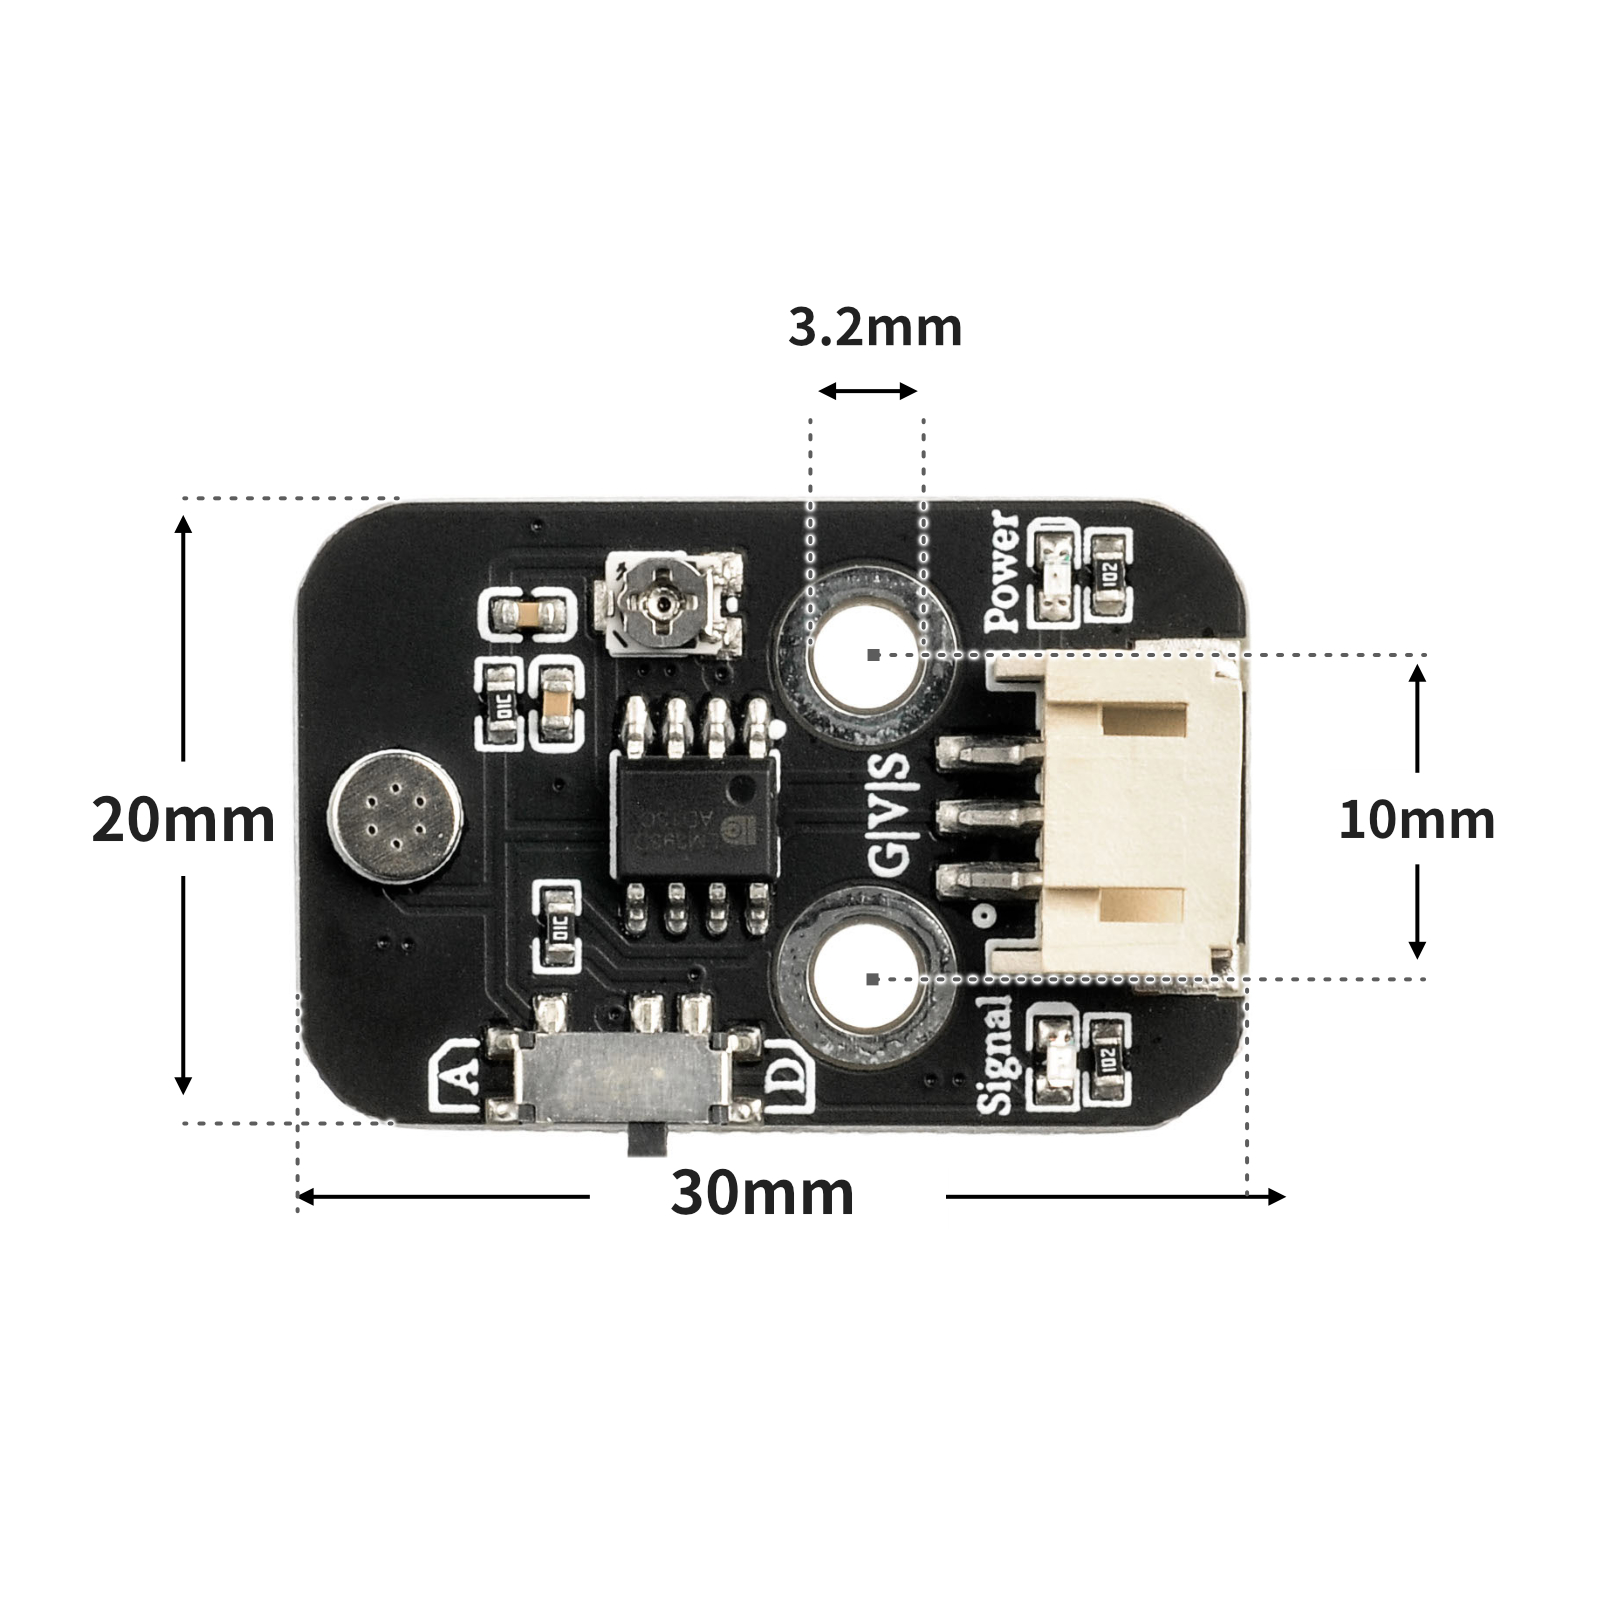
4, Circuit Board Size
5 of Arduino IDE example program
Attention: If prompted with an error message about the library file during program upload, please import the library file first!
Arduino IDE Library Download and Import Tutorial:Click to view
Example program (UNO development board):
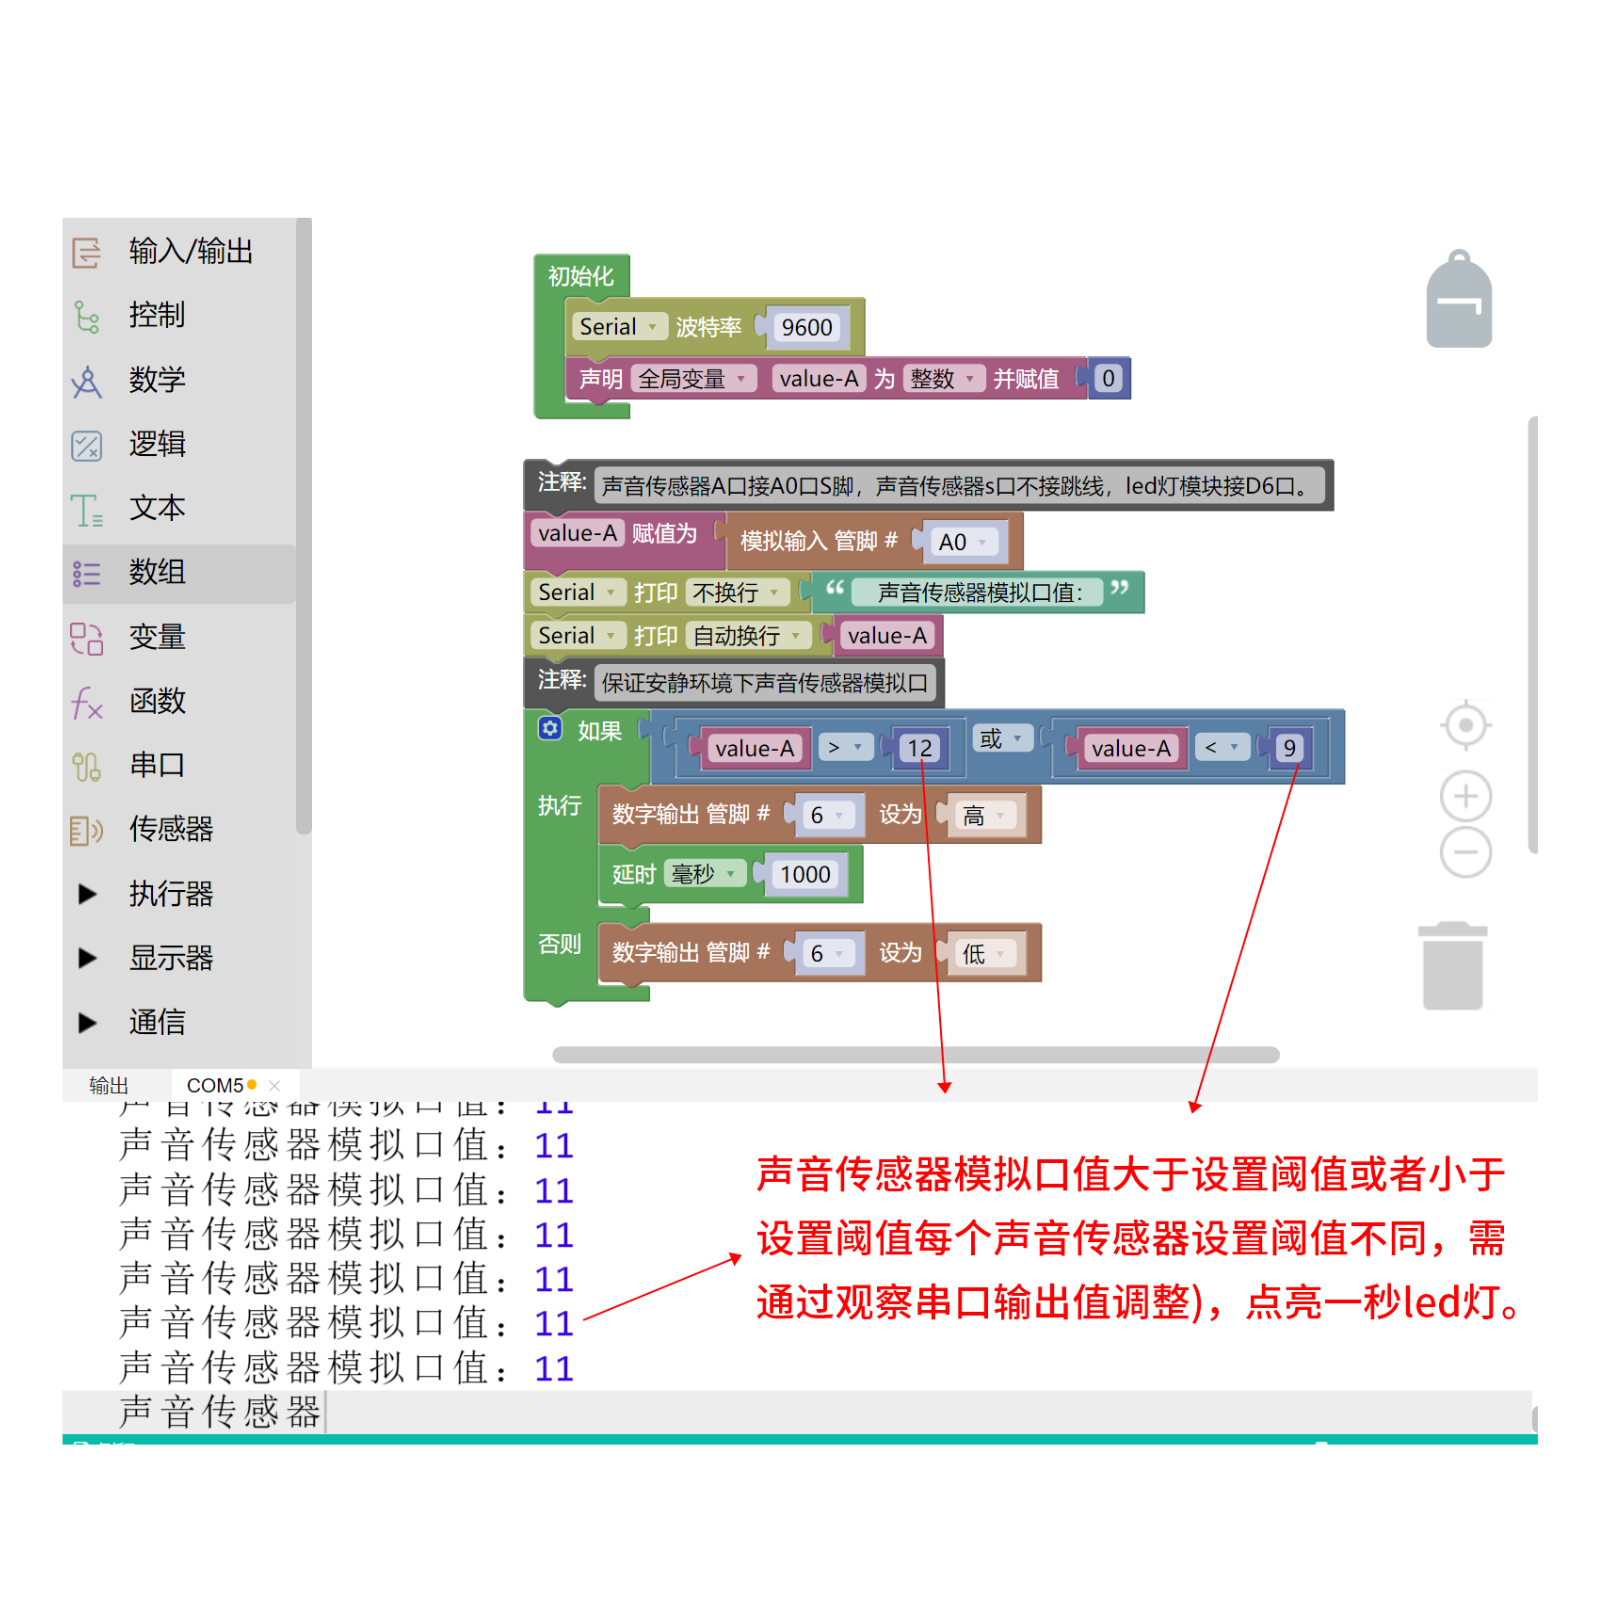
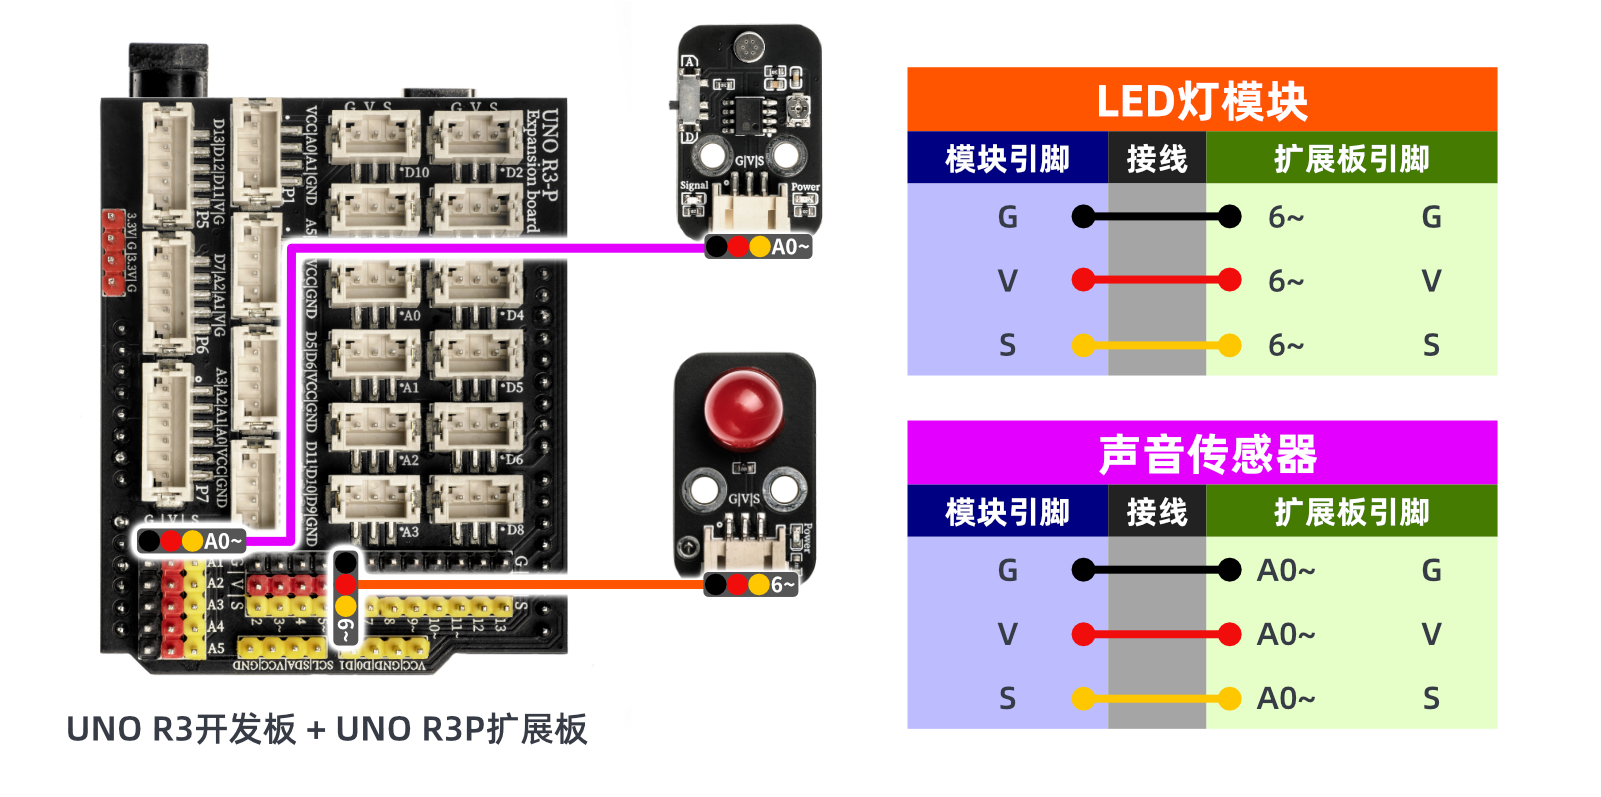
 //声音传感器A口接A0口S脚,声音传感器s口不接跳线,led灯模块接D6口。
 int value_A;

void setup(){
  Serial.begin(9600);//设置波特率9600

  pinMode(A0, INPUT);//设置模拟A0口模式,INPUT为输入,
  pinMode(6, OUTPUT);//设置数字6口模式,OUTPUT为输出,
}

void loop(){

  value_A = analogRead(A0);//读取声音传感器模拟值
  Serial.print("   声音传感器模拟口值:");
  Serial.println(value_A);//打印声音传感器模拟值
  //保证安静环境下声音传感器模拟口
  if (value_A > 13 || value_A < 9) {//声音传感器是否大于或者小于设置的阈值
    digitalWrite(6,HIGH);//led灯亮
    delay(1000);//暂停1s

  } else {
    digitalWrite(6,LOW);//led灯熄灭

  }

}
6, ESP32 Python Example (for Mixly IDE/Misashi)
Choose the development board Python ESP32 [ESP32 Generic(4MB)] and upload in code mode
Attention: If prompted with an error message about the library file during program upload, please import the library file first!
Download and import tutorial for Mixly IDE ESP32 library:Click to view
Example program (ESP32-Python):
import machine
import time


adc32.atten(machine.ADC.ATTN_11DB)
pin4 = machine.Pin(4, machine.Pin.OUT)
while True:
    if adc32.read_u16() >= 40000:
        pin4.value(1)
        time.sleep_ms(500)
    else:
        pin4.value(0)
7, Mixly example program (graphical language)
Example program (UNO development board):Click to download
Attention: If prompted with an error message about the library file during program upload, please import the library file first!
Download and import tutorial of Mixly IDE Arduino library:Click to view
Example Program (ESP32 Development Board):Click to download
Attention: If prompted with an error message about the library file during program upload, please import the library file first!
Download and import tutorial for Mixly IDE ESP32 library:Click to view
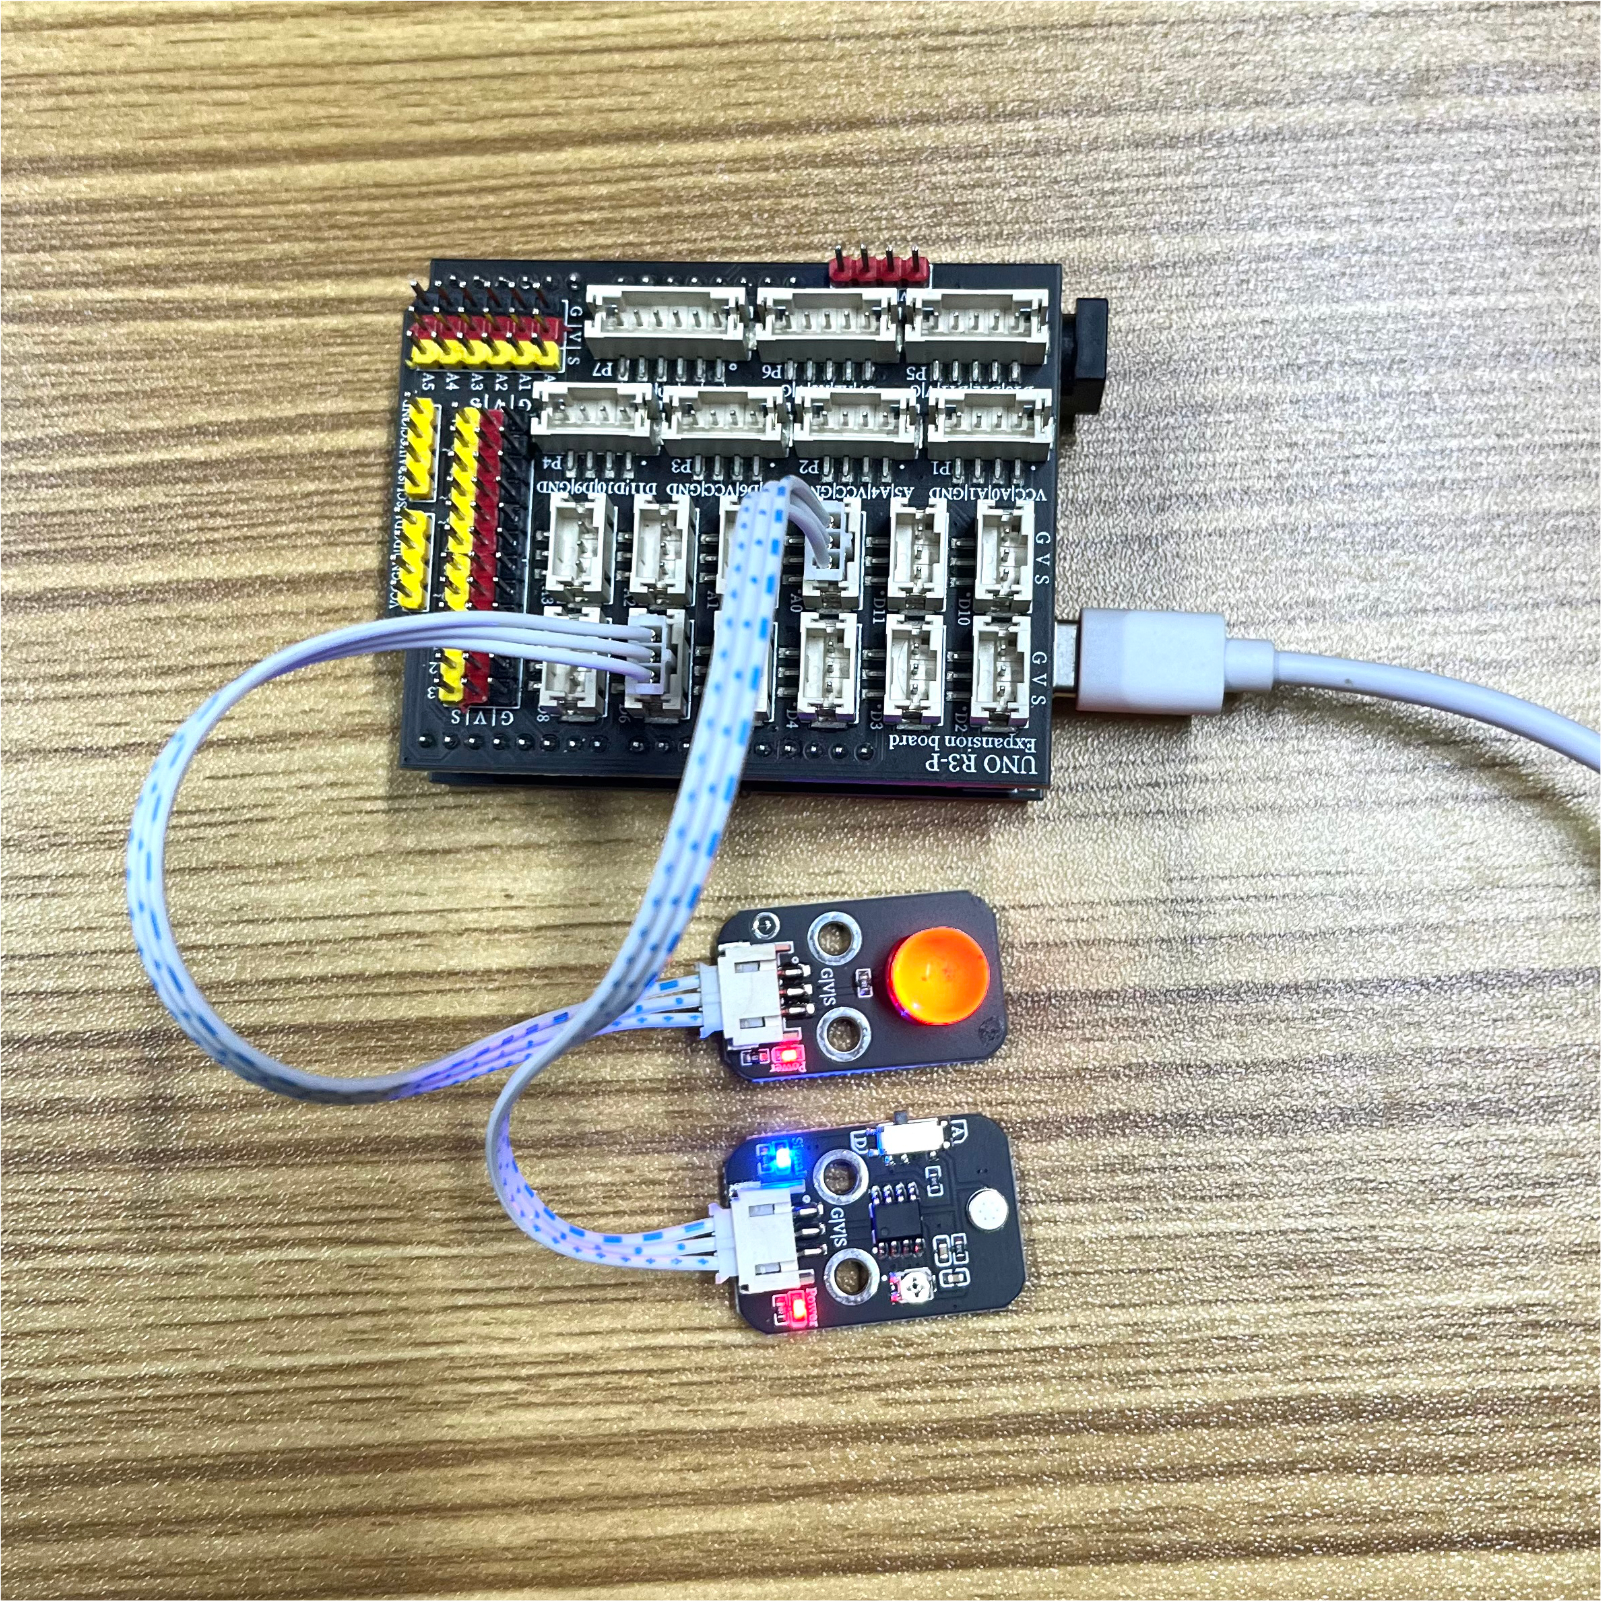
8. Setting up the Test Environment
Arduino UNO Test Environment Setup
Prepare Components:
HELLO STEM UNO R3 DEVELOPMENT BOARD *1
HELLO STEM UNO R3 P EXPANSION BOARD *1
USB TYPE-C DATA CABLE *1
LED module (HS-F08P) *1
Sound Sensor Module (HS-S05P) *1
PH2.0 Terminal to Dupont Wire *2 pieces
PH2.0 Two-Head Terminal Wire *2 pieces
Circuit wiring diagram:
ESP32 Test Environment Setup
Prepare Components:Pending update...
Circuit wiring diagram:Pending update...
9, Video tutorial
Video tutorial:Click to view
10, Test conclusion
Arduino UNO test results:
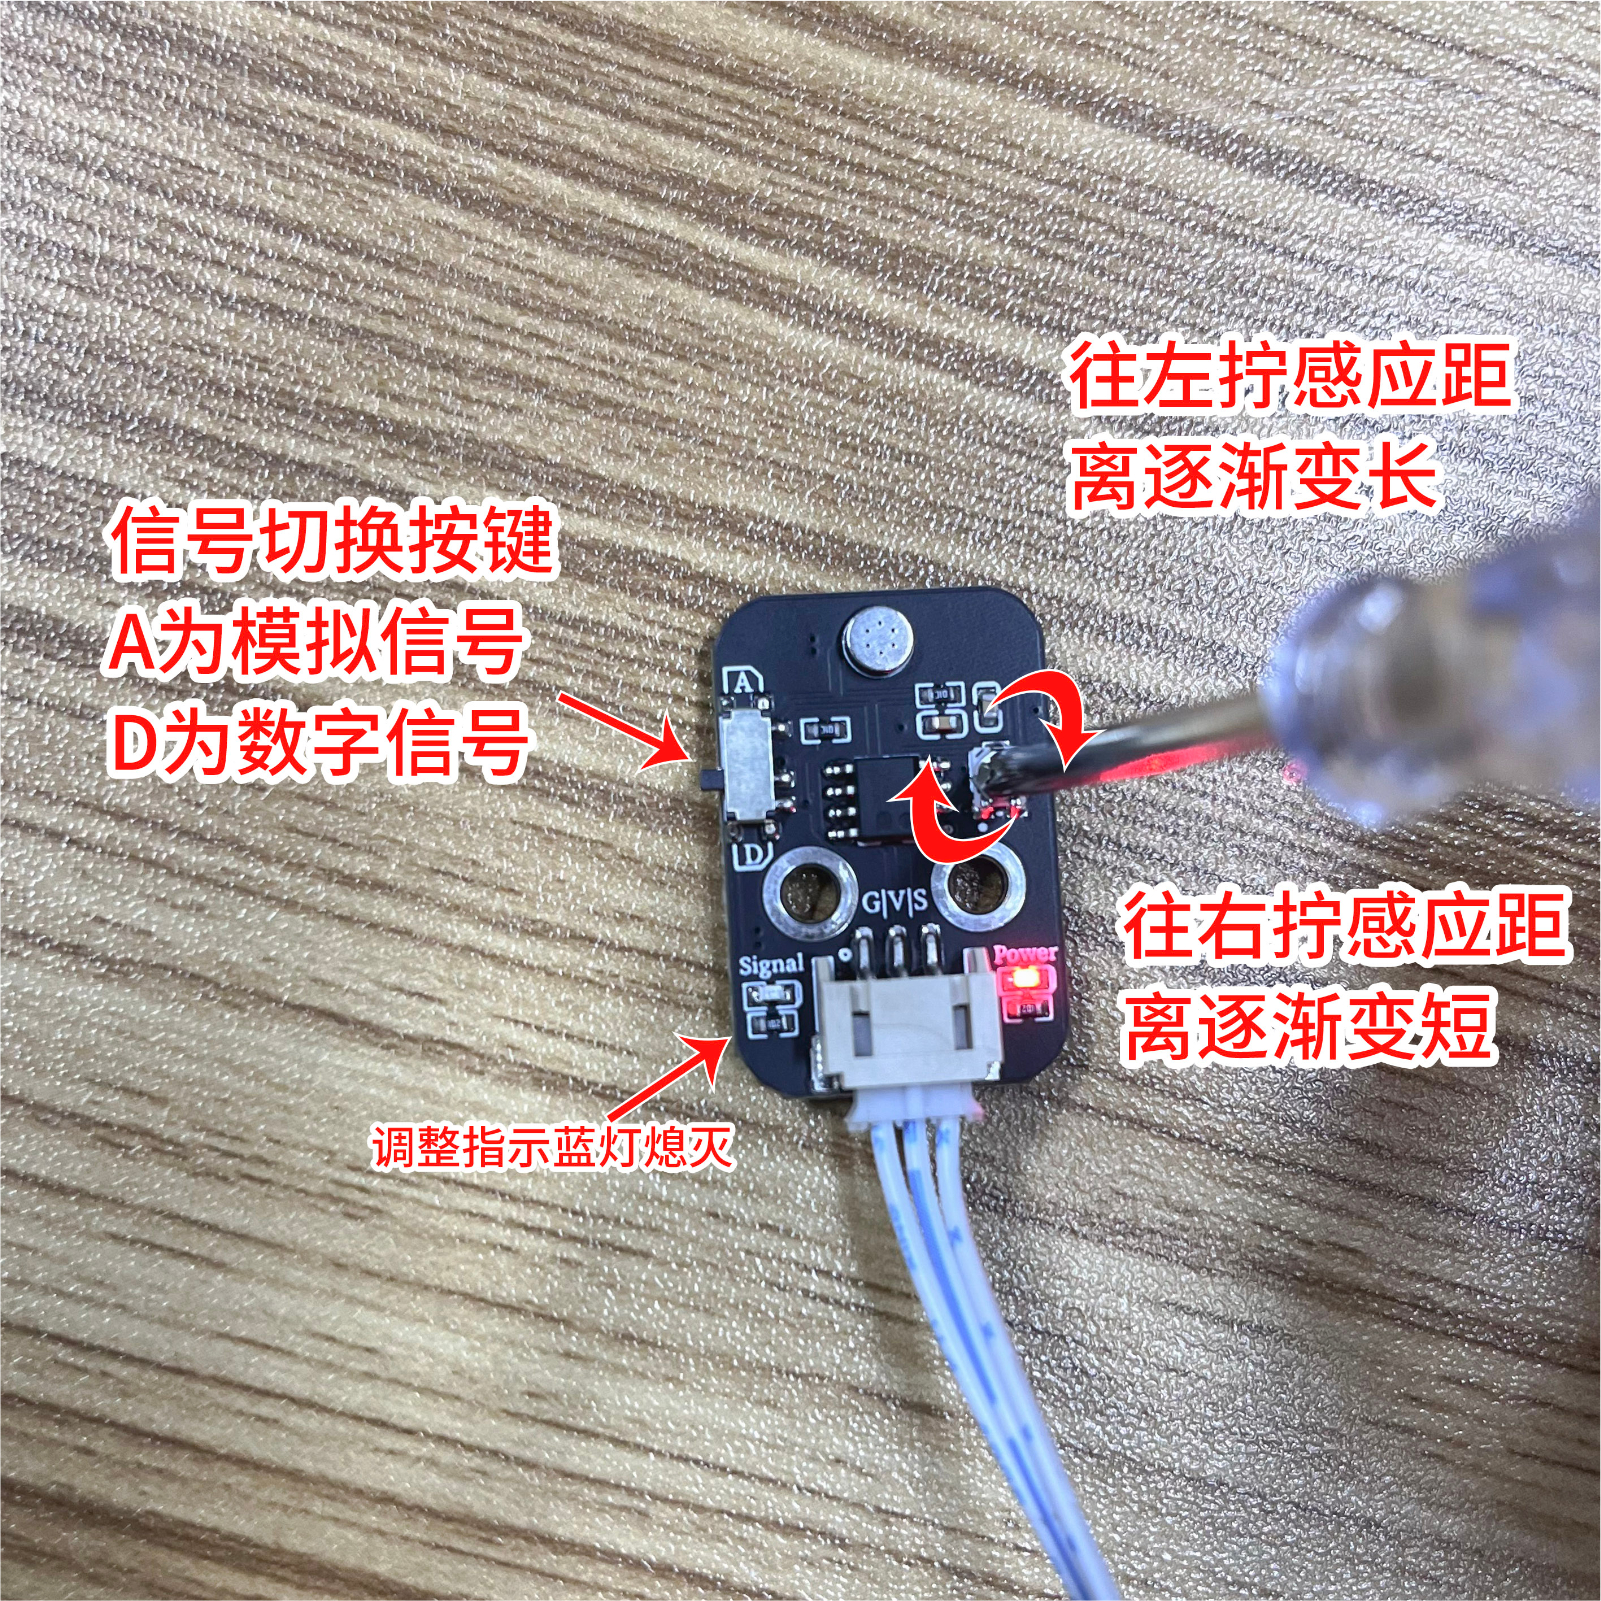
In the case of the sound sensor being powered on, adjust the potentiometer of the module with a small screwdriver, and rotate the potentiometer on the back of the module clockwise to turn off the signal blue light.
ESP32 Test Results:
Pending update...