
1. Introduction
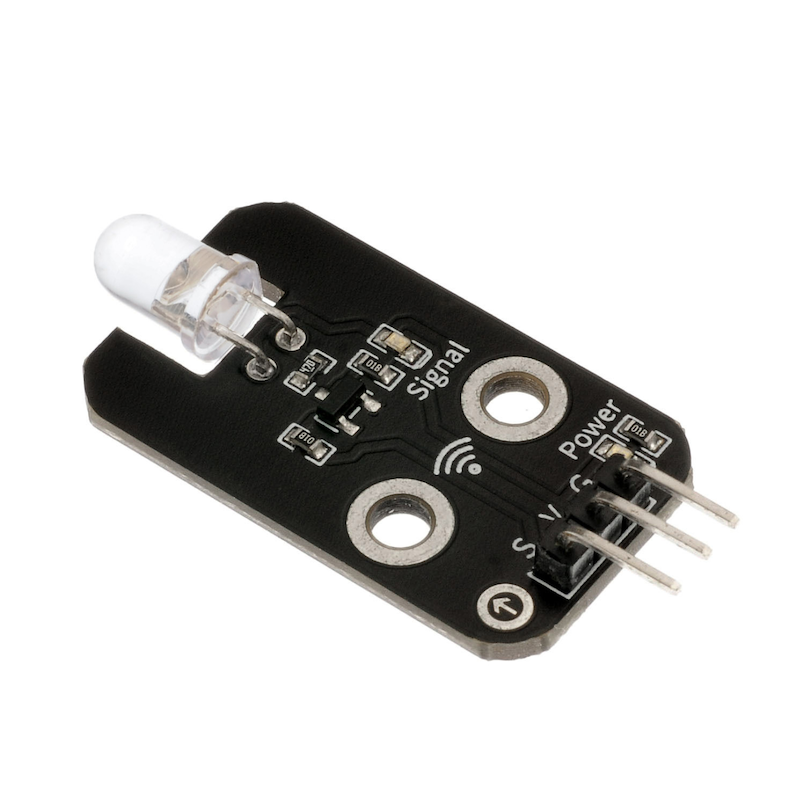
This will introduce the infrared signal transmitting module, in fact, they play an important role in our daily lives.This kind of device is widely used in many household appliances such as air conditioners, televisions, DVD players, etc., it is based on wireless sensing, and is also a remote control, it is necessary to study its principle and how to use it.The infrared emitter and receiver are devices that directly convert electrical energy into near infrared light, belonging to the diode category, and the infrared emitting diode emits a modulated signal.
2. Schematic
Infrared Signal Transmitter-HS-S29A SchematicClick to view
Module Parameters
Pin Name | description |
|---|---|
G | GND (Negative Power Input) |
V | VCC (Positive Power Input) |
S | Digital Signal Pin |
Power Supply Voltage: 3.3V / 5V
Connection Type: 2.54mm Header
Installation Method: Double Screw Fixed
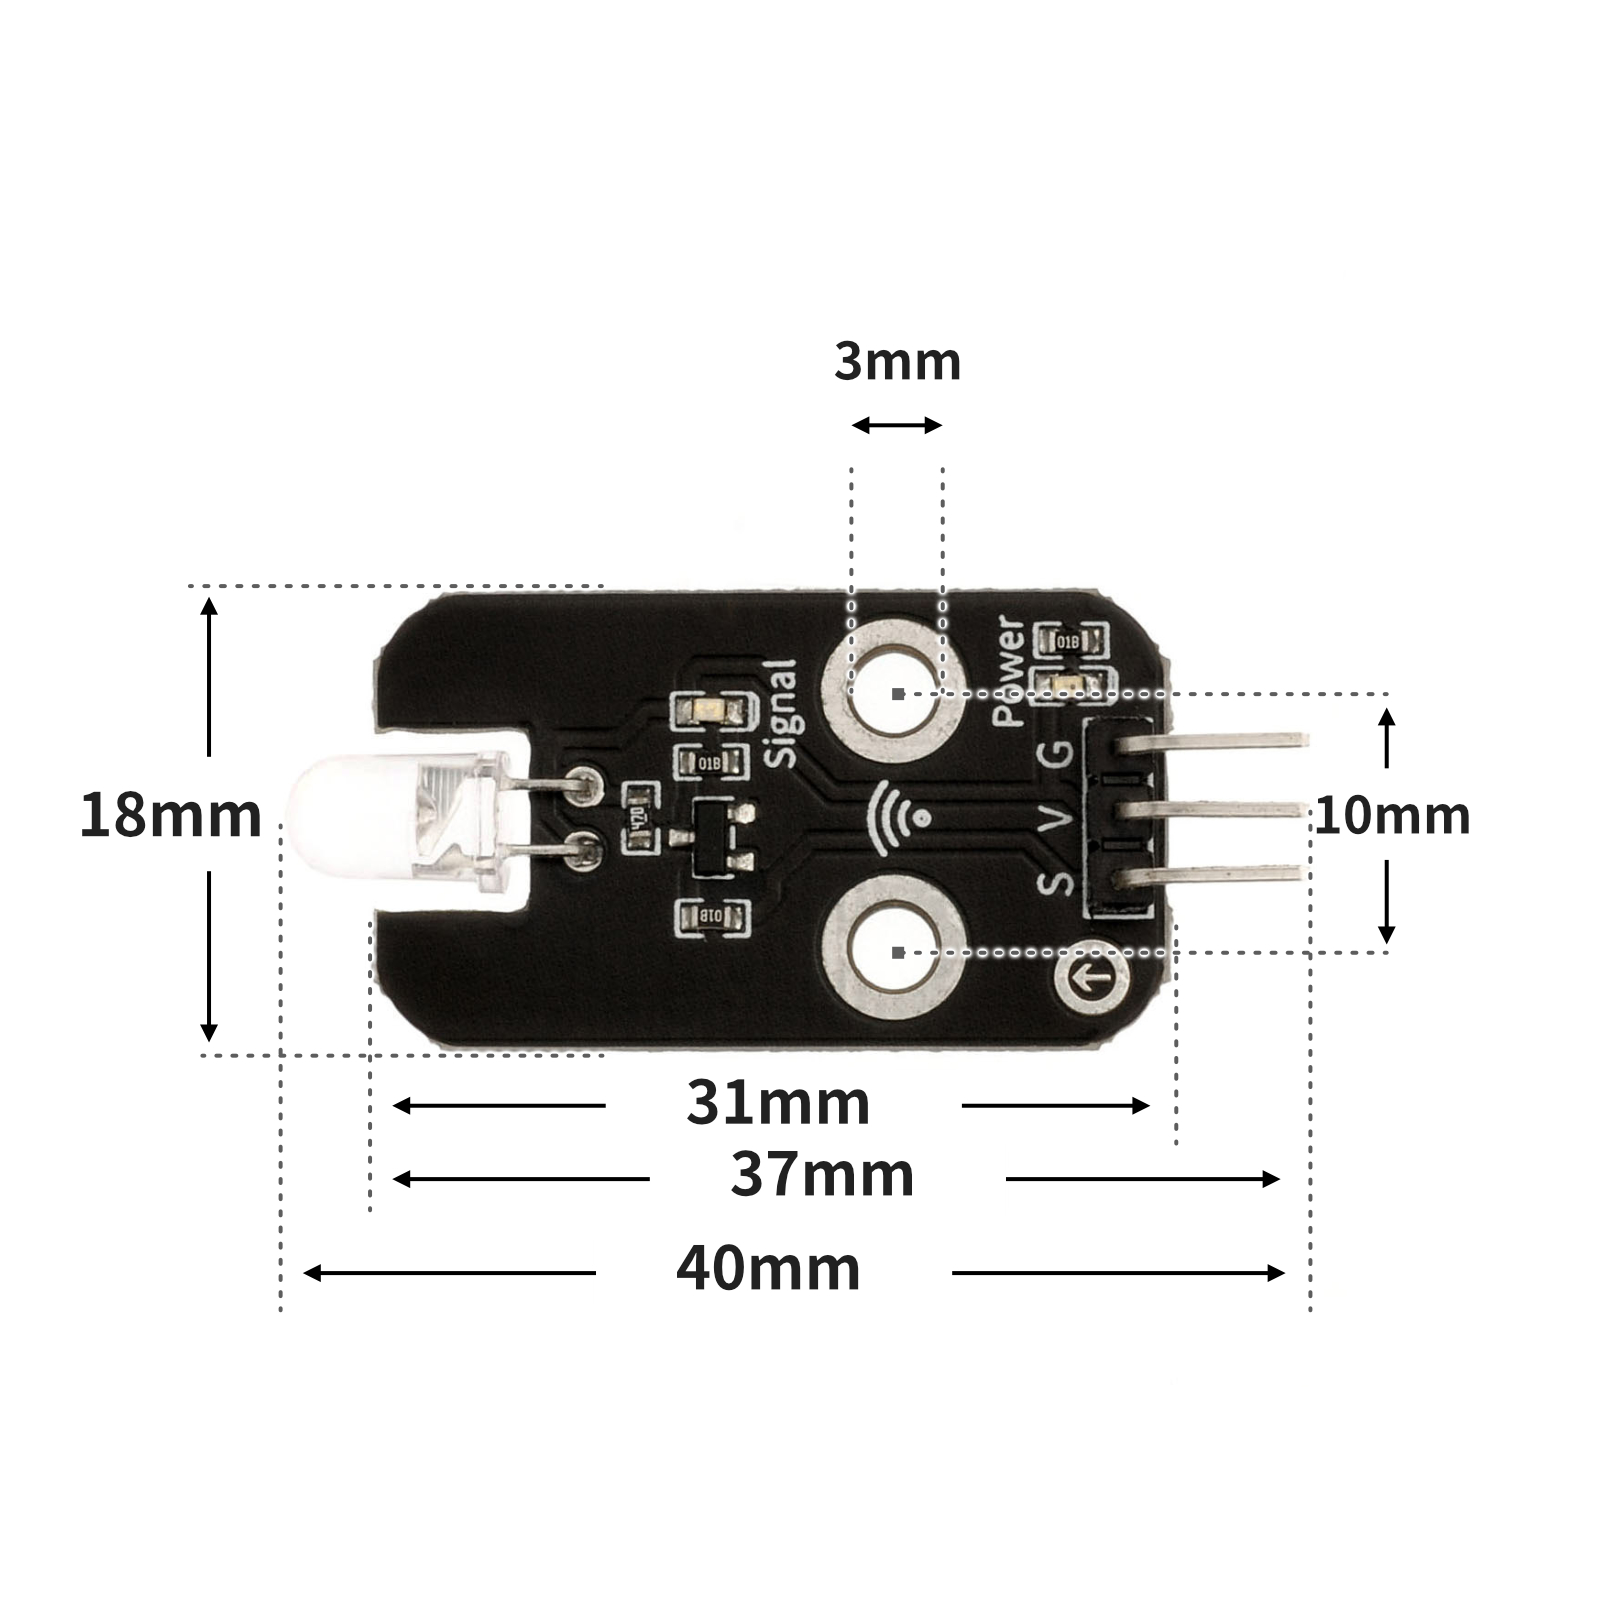
4, Circuit Board Size
5 of Arduino IDE example program
Attention: If prompted with an error message about the library file during program upload, please import the library file first!
Arduino IDE Library Download and Import Tutorial:Click to view
Example program (UNO development board):
1. Infrared Signal Transmission Module Program (equivalent to an infrared remote control)
#define IR_SEND_PIN 3
#include <IRremote.h>

IRsend   irsend;

void setup(){
  // 启动发送,并指定引脚;开启Arduino主板L灯反馈;
  IrSender.begin(IR_SEND_PIN, DISABLE_LED_FEEDBACK);
  pinMode(8, INPUT);
}

void loop(){
  // 定义红外发射管脚.

  if (!digitalRead(8)) {
      while (!digitalRead(8)) {
        delay(10);
      }
      // 发送红外编码值
      IrSender.sendNEC(0xFF00,0x45,0 );

    }

}
2. Infrared Signal Reception Module Program
#include <IRremote.h>

volatile int a;
const String IR_PROTOCOL_TYPE[] = {
  "UNKNOWN",
  "PULSE_DISTANCE",
  "PULSE_WIDTH",
  "DENON",
  "DISH",
  "JVC",
  "LG",
  "LG2",
  "NEC",
  "PANASONIC",
  "KASEIKYO",
  "KASEIKYO_JVC",
  "KASEIKYO_DENON",
  "KASEIKYO_SHARP",
  "KASEIKYO_MITSUBISHI",
  "RC5",
  "RC6",
  "SAMSUNG",
  "SHARP",
  "SONY",
  "ONKYO",
  "APPLE",
  "BOSEWAVE",
  "LEGO_PF",
  "MAGIQUEST",
  "WHYNTER"
};
IRrecv irrecv_11(11);

void setup(){
  a = 0;
  Serial.begin(9600);
  pinMode(5, OUTPUT);
  irrecv_11.enableIRIn();
}

void loop(){
  if (irrecv_11.decode()) {
    struct IRData *pIrData = &irrecv_11.decodedIRData;
    long ir_item = pIrData->decodedRawData;
    String irProtocol = IR_PROTOCOL_TYPE[pIrData->protocol];
    Serial.print("IR TYPE:" + irProtocol + "\tVALUE:");
    Serial.println(ir_item, HEX);
    irrecv_11.resume();
    Serial.println(ir_item,HEX);
    //按下另一块控制板“D8”按键编码值:BA45FF00。控制开关灯。
    if (0xBA45FF00 == ir_item && a == 0) {
      digitalWrite(5,HIGH);
      a = 1;

    } else if (0xBA45FF00 == ir_item && a == 1) {
      digitalWrite(5,LOW);
      a = 0;
    }

  } else {

  }

}
6, ESP32 Python Example (for Mixly IDE/Misashi)
Choose the development board Python ESP32 [ESP32 Generic(4MB)] and upload in code mode
Attention: If prompted with an error message about the library file during program upload, please import the library file first!
Download and import tutorial for Mixly IDE ESP32 library:Click to view
Example program (ESP32-Python):
1. Infrared Signal Transmission Module Program (equivalent to an infrared remote control)
import machine
import irremote
import time


pin13 = machine.Pin(13, machine.Pin.IN)
ir_tx = irremote.NEC_TX(4,False,100)
while True:
    if not pin13.value():
        while not pin13.value():
            time.sleep_ms(10)
        ir_tx.transmit(0x45,0xff00,0)
2. Infrared Signal Reception Module Program
import machine
import irremote


pin15 = machine.Pin(15, machine.Pin.OUT)
value = 0
Mode = 0
ir_rx = irremote.NEC_RX(14,8)
while True:
    if ir_rx.any():
        value = hex(ir_rx.code[2])
    if value == hex(0xba45ff00):
        Mode = 1 - Mode
        value = 0
    if Mode == 0:
        pin15.value(0)
    if Mode == 1:
        pin15.value(1)
7, Mixly example program (graphical language)
Example program (UNO development board):Click to download
Attention: If prompted with an error message about the library file during program upload, please import the library file first!
Download and import tutorial of Mixly IDE Arduino library:Click to view
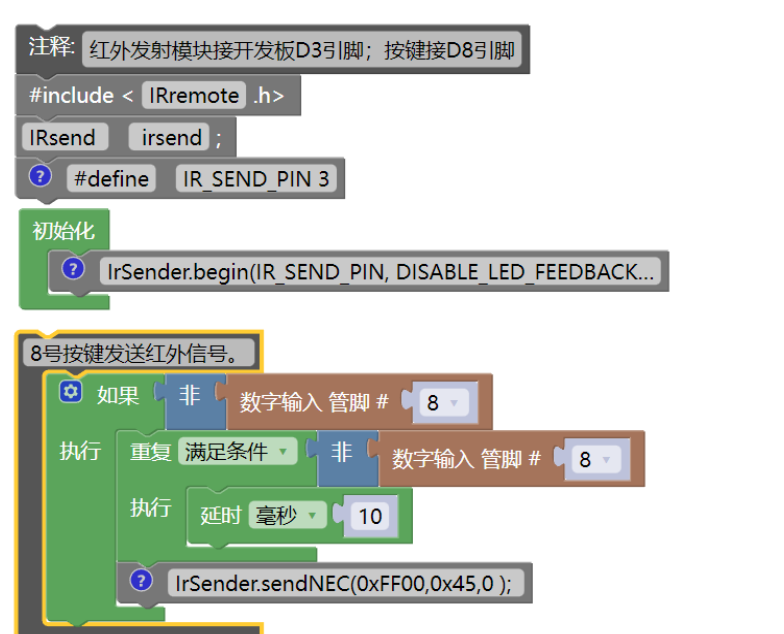
1. Infrared Signal Transmission Module Program (equivalent to an infrared remote control)
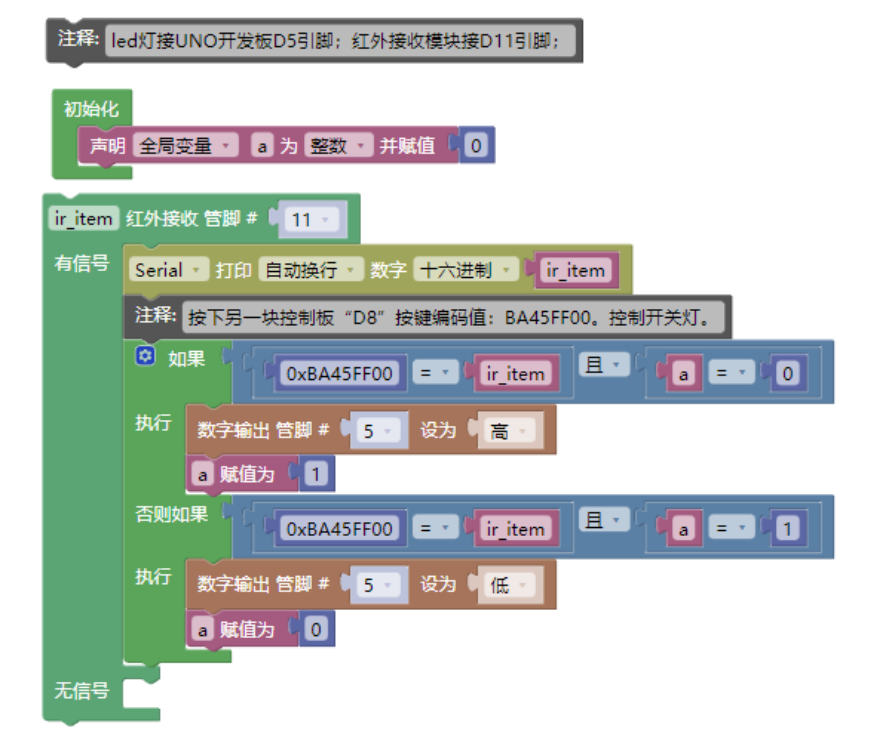
2. Infrared Signal Reception Module Program
Example Program (ESP32 Development Board):Click to download
Attention: If prompted with an error message about the library file during program upload, please import the library file first!
Download and import tutorial for Mixly IDE ESP32 library:Click to view
1. Infrared Signal Transmission Module Program (equivalent to an infrared remote control)
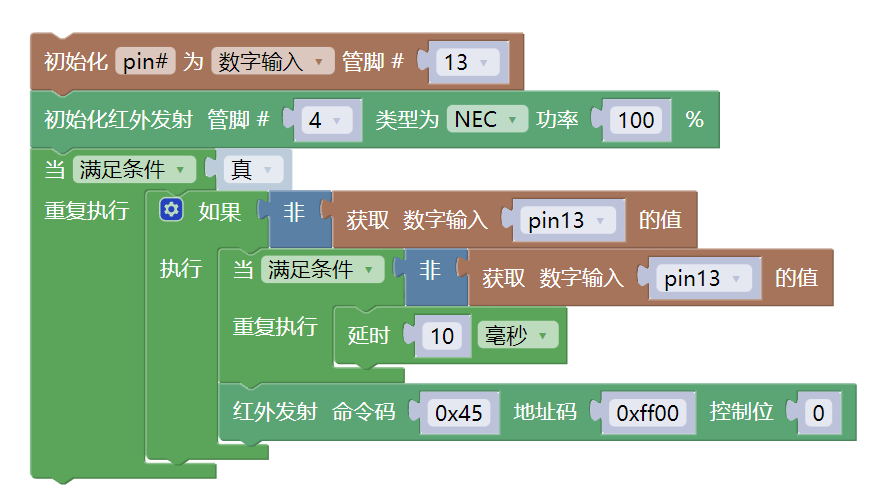
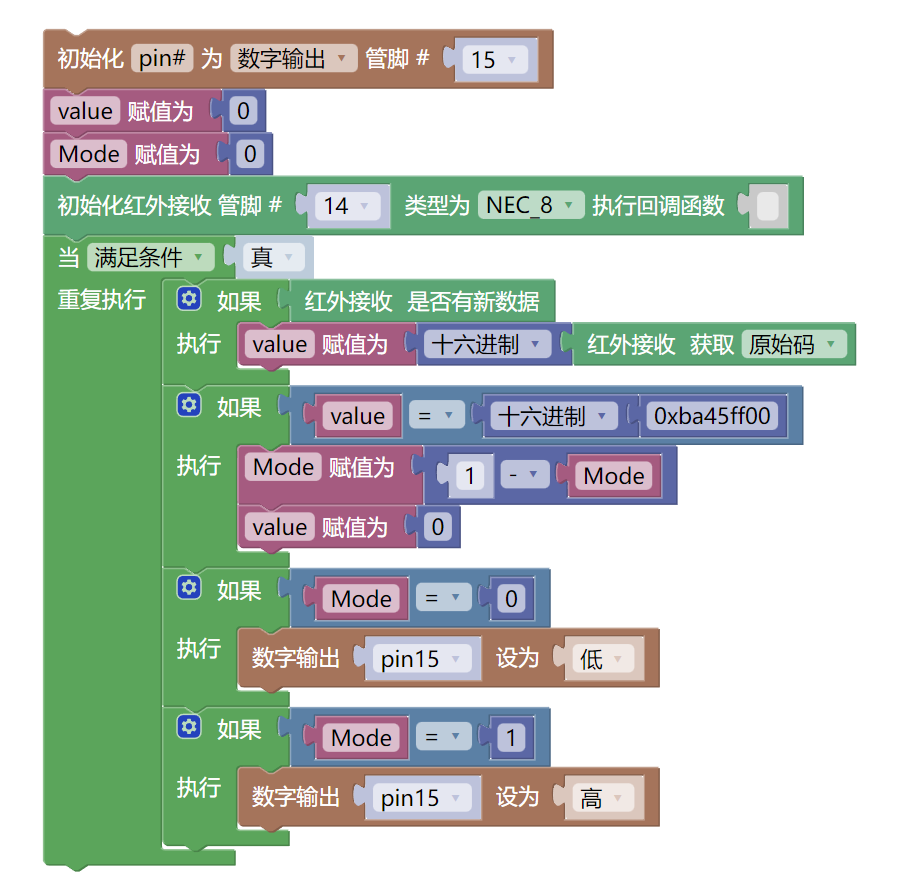
2. Infrared Signal Reception Module Program
8. Setting up the Test Environment
Arduino UNO Test Environment Setup
Prepare Components:
HELLO STEM UNO R3 PRO DEVELOPMENT BOARD *2
USB type-c data cable *2
LED light module (HS-F08A) *1
INFRARED SIGNAL TRANSMISSION MODULE (HS-S29A) *1
Push button switch module (HS-KEY1B) *1
Infrared receiver module (HS-S23A) *1
1P female to female DuPont wire *12 or 3P female to female DuPont wire *4
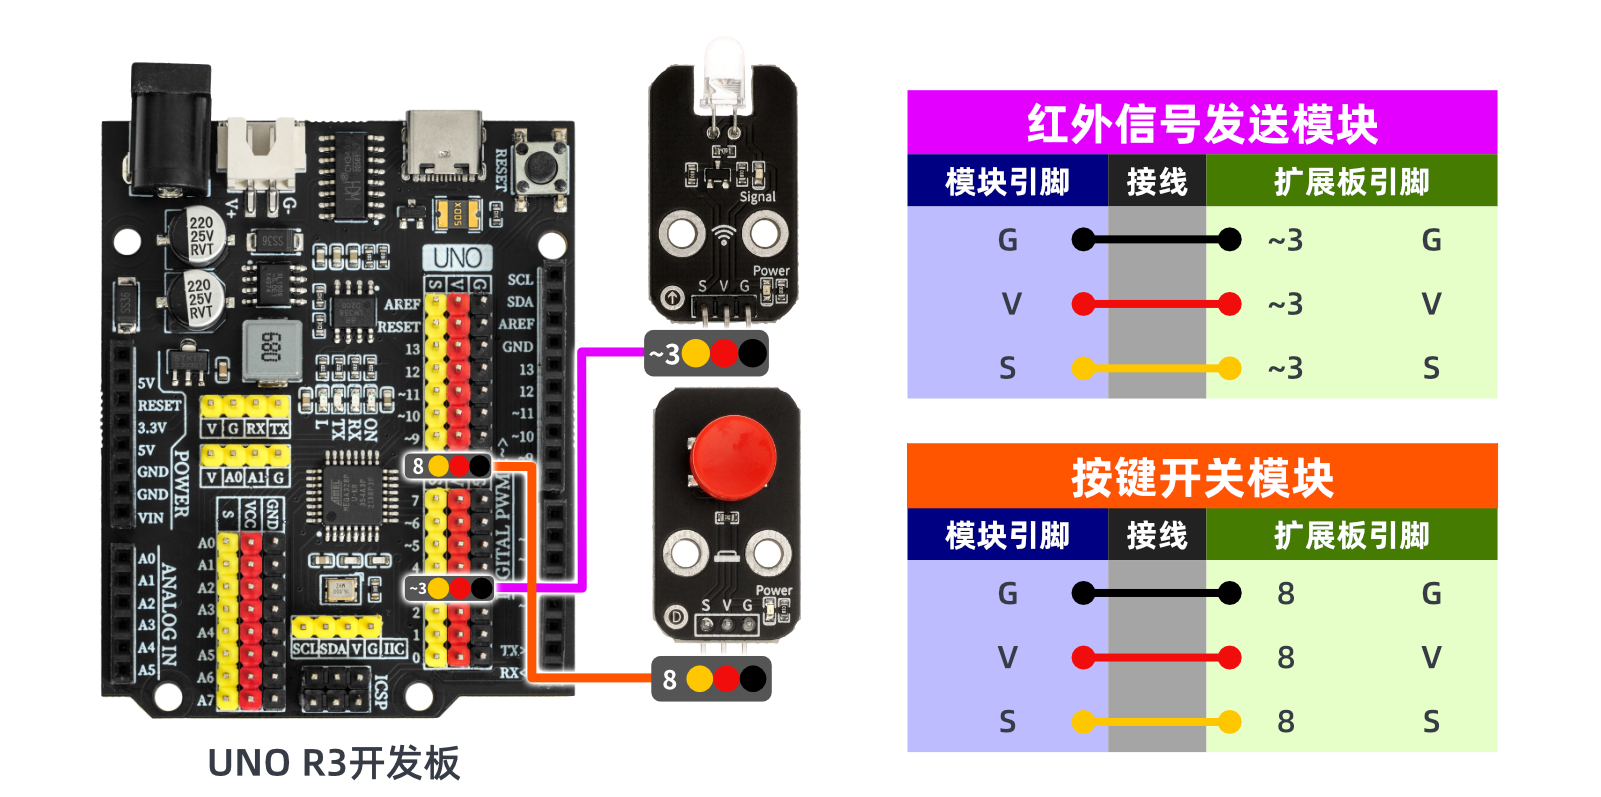
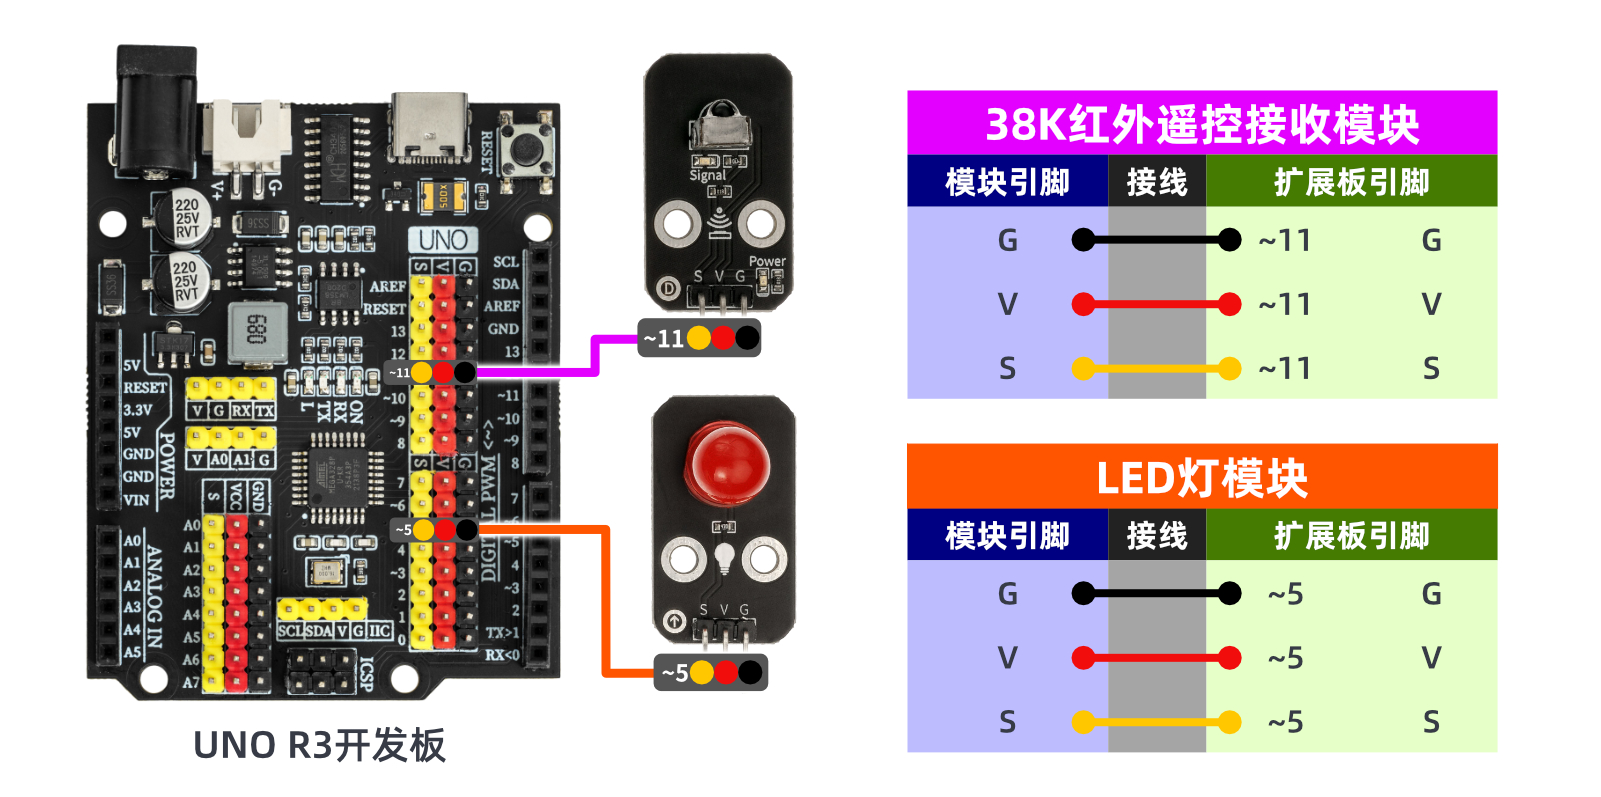
Circuit wiring diagram:
ESP32 Python Test Environment Setup
Prepare Components:
ESP32EA MOC development board *2
ESP32-EXP1 expansion board *2
USB type-c data cable *2
LED light module (HS-F08A) *1
INFRARED SIGNAL TRANSMISSION MODULE (HS-S29A) *1
Push button switch module (HS-KEY1B) *1
Infrared receiver module (HS-S23A) *1
PH2.0 double-ended terminal line *4 pieces
Circuit wiring diagram:Pending update...
9, Video tutorial
Video tutorial:Click to view
10, Test results
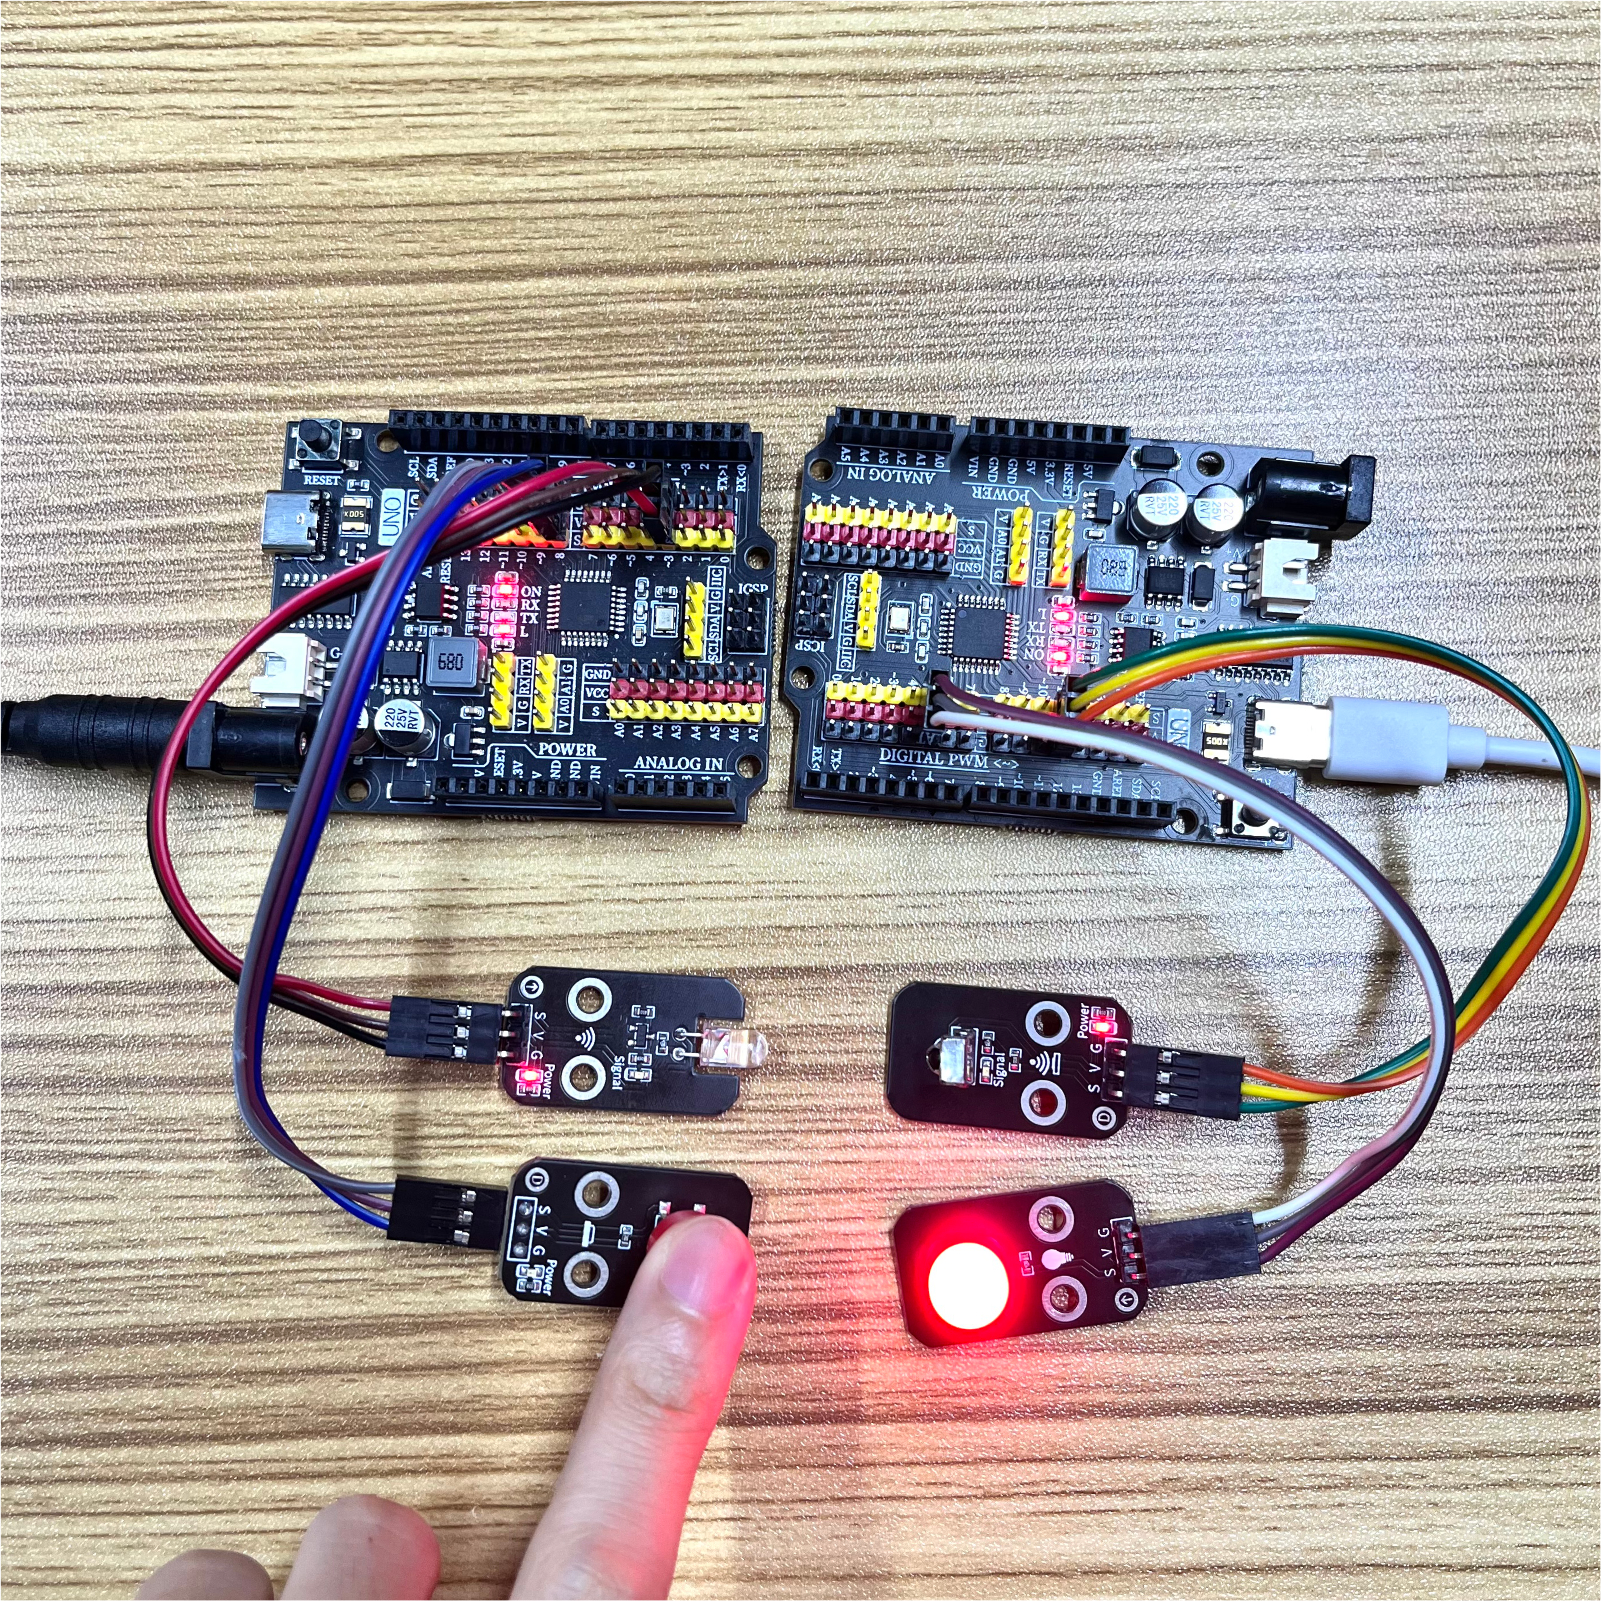
Arduino UNO test results:
After the device is connected to the wires, burn the above program to the Arduino UNO development board, then connect the infrared signal transmission experiment according to the description in the document, and burn the infrared receiver program to another Arduino UNO development board. Power it on and you can see the transmitting and receiving effects.
ESP32 Test Results:
Pending update...